Quick Answer
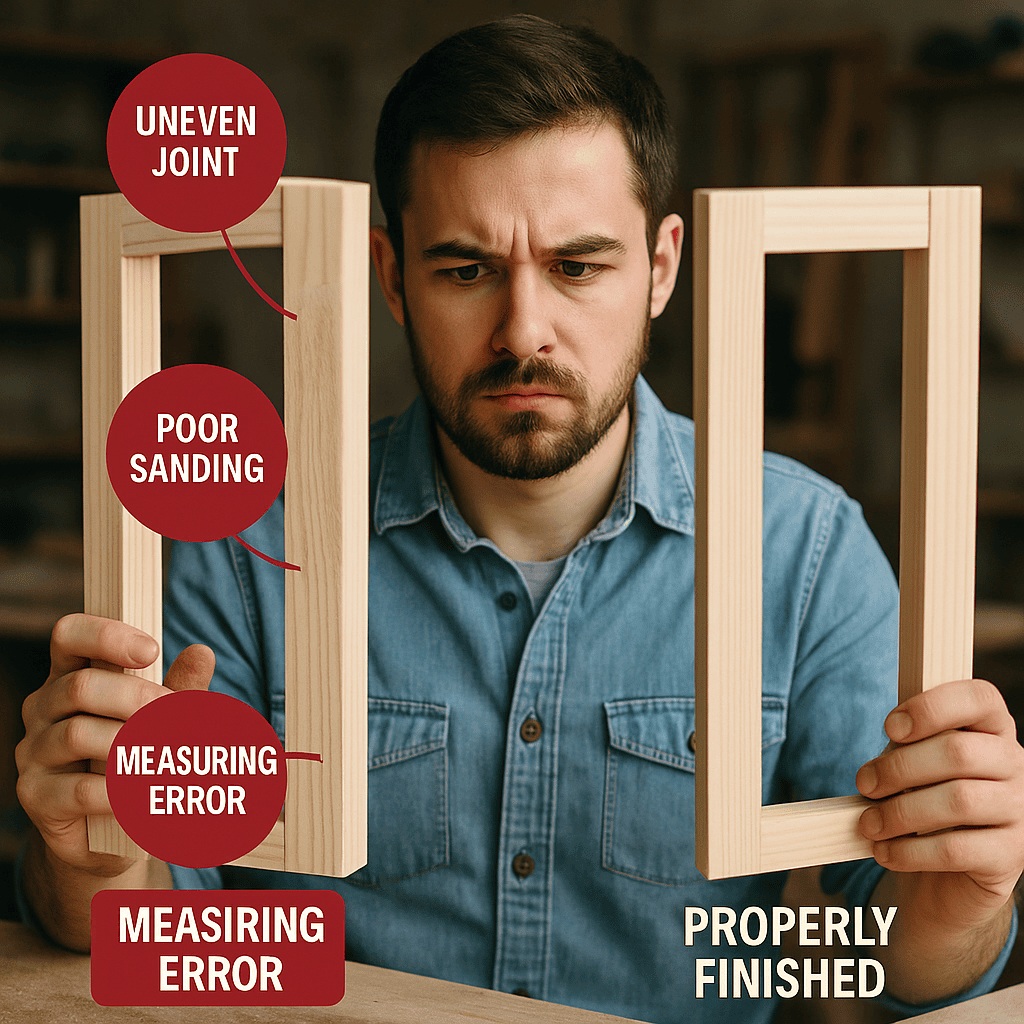
The most common woodworking mistakes include inaccurate measuring, poor tool safety, ignoring wood movement, improper sanding, weak glue-ups, and rushed finishing.
Preventing these errors requires careful planning, accurate measurements, proper tool use, and patience throughout every stage of a woodworking project.
Key Takeaways
- Measure carefully and verify dimensions before making any cuts.
- Always account for wood movement to prevent cracks and warped projects.
- Proper sanding and finishing techniques produce professional-looking results.
- Strong glue joints depend on proper clamping, preparation, and cleanup.
- Safe tool operation reduces injuries and improves work quality.
- Careful planning helps eliminate costly mistakes before they happen.
- Learning from small mistakes builds confidence and improves craftsmanship.
10 Common Woodworking Mistakes and How to Avoid Them
Woodworking is one of the most rewarding DIY hobbies, but every woodworker—from beginners to seasoned professionals—makes mistakes. The difference is that experienced woodworkers know how to prevent small errors from becoming expensive problems.
Many woodworking mistakes don’t become obvious until a project is nearly finished. A board that was measured incorrectly, a glue joint that shifted, or a finish applied too quickly can undo hours of hard work.
Fortunately, most common woodworking mistakes are entirely preventable. By understanding where projects typically go wrong, you can improve accuracy, save materials, and build furniture and woodworking projects with greater confidence.
This guide covers ten of the most common woodworking mistakes, explains why they happen, and provides practical solutions to help you avoid them.
Why Do Woodworking Mistakes Happen?
Woodworking combines precision, patience, and problem-solving. Even a small error can affect every step that follows.
Most beginner woodworking errors fall into one of these categories:
- Poor planning
- Inaccurate measuring
- Improper tool use
- Ignoring wood behavior
- Rushing the process
Recognizing these patterns helps you develop better habits before mistakes become expensive.
Key Takeaway: Most woodworking mistakes result from rushing or overlooking basic preparation rather than lacking expensive tools.
Mistake #1: Measuring and Marking Errors
Why Is Accurate Measuring So Important?
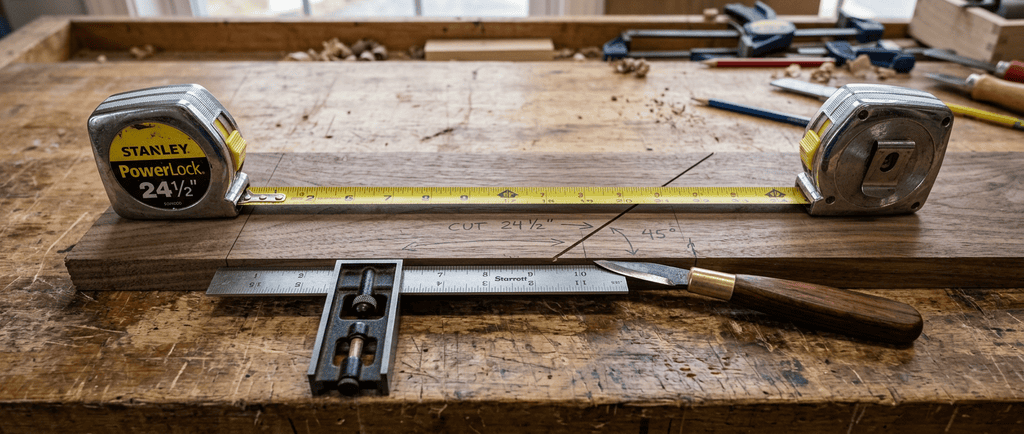
The old saying “Measure twice, cut once” remains one of the most valuable lessons in woodworking.
Even a measurement that is off by 1/16 inch can cause:
- Gaps in joints
- Crooked assemblies
- Uneven shelves
- Misaligned cabinet doors
How to Prevent Measuring Mistakes
- Measure twice before every cut.
- Use the same tape measure throughout the project.
- Mark cut lines with a sharp pencil or marking knife.
- Clearly identify the waste side of every cut.
- Verify dimensions before turning on the saw.
Practical Example
Instead of measuring identical parts separately, cut one piece first and use it as a template for matching pieces. This method minimizes cumulative measuring errors.
Key Takeaway: Accurate measuring and marking create the foundation for every successful woodworking project.
Mistake #2: Ignoring Wood Movement
Why Does Wood Expand and Contract?
Wood is a natural material that absorbs and releases moisture as humidity changes.
This causes boards to:
- Expand
- Contract
- Twist
- Cup
- Warp
One of the most common woodworking mistakes is treating wood as though its dimensions never change.
How to Avoid Wood Movement Issues
- Leave room for seasonal expansion.
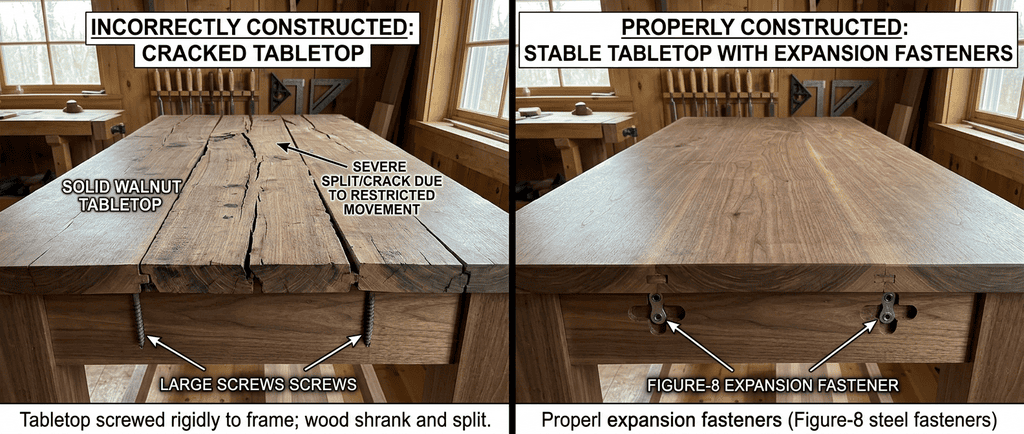
- Avoid gluing wide solid wood panels into rigid frames.
- Use elongated screw holes where appropriate.
- Select properly dried lumber.
- Store wood in your workshop for several days before building.
Practical Example
A tabletop fastened with screws directly through the apron may crack during seasonal changes. Using figure-eight fasteners or tabletop clips allows natural movement without damaging the project.
Key Takeaway: Designing for wood movement prevents cracked panels and long-term structural failures.
Mistake #3: Using Dull or Poorly Maintained Tools
How Do Dull Tools Affect Woodworking?
Many beginners believe dull tools are simply less efficient.
In reality, they are also less safe.
Dull blades require more force, increasing the likelihood of:
- Kickback
- Splintering
- Tear-out
- Burn marks
- Loss of control
How to Prevent Tool Problems
Maintain tools regularly by:
- Sharpening chisels
- Replacing worn saw blades
- Cleaning router bits
- Lubricating moving parts
- Checking blade alignment
Practical Example
A sharp table saw blade leaves smooth edges requiring minimal sanding, while a dull blade produces rough cuts that increase finishing time.
Key Takeaway: Sharp, properly maintained tools improve both safety and woodworking accuracy.
Mistake #4: Poor Tool Safety Practices
Why Is Tool Safety Essential?
Tool safety in woodworking protects more than your hands—it protects your ability to continue enjoying the hobby.
Many workshop injuries occur because experienced users become overly comfortable with familiar tools.
Common Safety Mistakes
- Removing blade guards
- Working without eye protection
- Ignoring hearing protection
- Wearing loose clothing
- Reaching over spinning blades
- Using damaged extension cords
Best Safety Practices
Always:
- Wear safety glasses.
- Use hearing protection.
- Wear a dust mask or respirator when sanding.
- Disconnect power before changing blades.
- Keep your workspace clean.
- Follow the manufacturer’s instructions.
Practical Example
Cleaning sawdust from the floor between operations significantly reduces slip hazards and improves visibility around machines.
Key Takeaway: Safe habits become automatic when practiced consistently, reducing both injuries and costly mistakes.
Mistake #5: Weak Glue-Up Techniques
Why Do Glue Joints Fail?
Glue is often stronger than the wood itself—but only when applied correctly.
Glue failures usually result from poor preparation rather than poor adhesive.
Common Glue-Up Mistakes
- Applying too little glue
- Using excessive glue
- Uneven clamp pressure
- Dirty joint surfaces
- Waiting too long before clamping
How to Improve Glue-Ups
- Dry-fit every assembly first.
- Ensure mating surfaces are flat.
- Apply an even coat of glue.
- Use enough clamps to distribute pressure evenly.
- Remove squeeze-out after partial curing or while still wet, depending on the adhesive.
Practical Example
Assembling a cabinet without a dry fit may reveal alignment issues after glue has already been applied, leaving little time for corrections.
Key Takeaway: Careful preparation and even clamping produce stronger, cleaner glue joints with less frustration.
Mistake #6: Sanding Mistakes
Why Does Sanding Affect the Final Appearance?
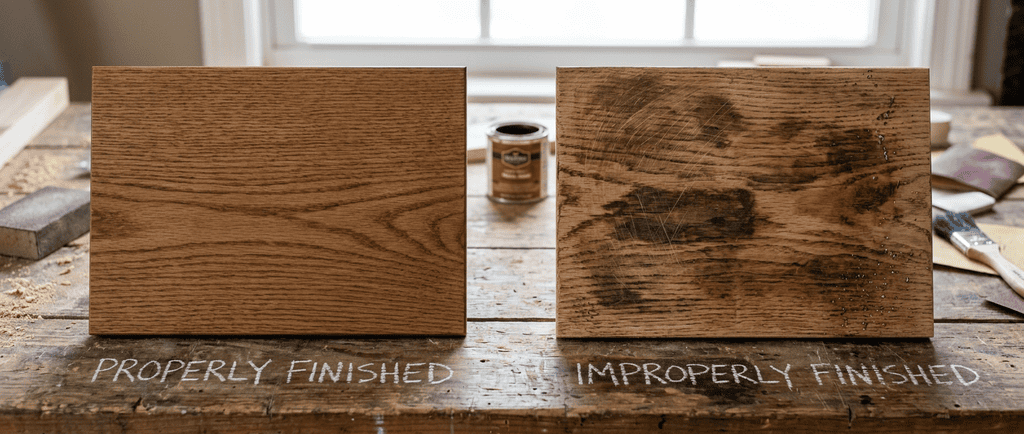
Sanding is more than smoothing rough wood—it prepares the surface for stain, paint, or a clear finish. Poor sanding is one of the most common woodworking mistakes because flaws often become visible only after the finish is applied.
Common Sanding Mistakes
- Skipping grit levels
- Sanding across the grain
- Applying uneven pressure
- Over-sanding edges and corners
- Leaving sanding dust on the surface
How to Avoid Sanding Mistakes
Follow these best practices:
- Start with the appropriate grit for the wood’s condition.
- Progress gradually through finer grits (for example, 80, 120, 180, and 220).
- Sand with the grain whenever possible.
- Use a random orbital sander for large flat surfaces.
- Remove dust thoroughly with a vacuum, compressed air, or tack cloth before finishing.
Practical Example
If you jump from 80-grit directly to 220-grit sandpaper, the deeper scratches left by the coarse grit may remain visible after staining.
Key Takeaway: Proper sanding creates a smooth, even surface that allows finishes to perform their best.
Mistake #7: Rushing the Finishing Process
Why Do Finishing Mistakes Ruin Otherwise Great Projects?
Even a perfectly built project can look disappointing if the finish is applied incorrectly. Many finishing mistakes in woodworking happen because beginners rush through the final steps.
Common Finishing Errors
- Applying stain unevenly
- Using thick coats of finish
- Ignoring drying times
- Finishing in dusty environments
- Failing to test finishes on scrap wood
How to Prevent Finishing Problems
- Read the manufacturer’s instructions.
- Apply several thin coats instead of one heavy coat.
- Allow each coat to dry completely before recoating.
- Lightly sand between coats when recommended.
- Test stain and finish on offcuts from your project.
Practical Example
Applying polyurethane too heavily often creates runs, bubbles, or a cloudy appearance that requires extensive sanding and refinishing.
Key Takeaway: Patience during finishing produces a durable, attractive surface that enhances the beauty of the wood.
Mistake #8: Choosing the Wrong Joinery
Why Does Joinery Matter?
Joinery determines the strength, durability, and appearance of a woodworking project. Choosing the wrong joint can lead to weak assemblies or premature failure.
Common Joinery Mistakes
- Using butt joints where stronger joints are needed
- Poorly fitting mortise-and-tenon joints
- Misaligned dowels or biscuits
- Incorrect screw placement
- Weak glue surfaces
How to Choose the Right Joint
Consider the project’s purpose:
| Project Type | Recommended Joinery |
|---|---|
| Picture Frame | Miter Joint |
| Cabinet | Dado or Rabbet |
| Table | Mortise and Tenon |
| Drawer | Dovetail or Box Joint |
| Shelving | Pocket Holes or Dados |
Practical Example
A simple butt joint may be sufficient for a utility shelf but is rarely strong enough for a dining table that experiences constant stress.
Key Takeaway: Select joinery based on the structural demands of the project rather than ease of construction alone.
Mistake #9: Skipping Project Planning
Why Is Planning Essential?
Many woodworking projects fail before the first board is cut because there was no clear plan.
Without preparation, you may encounter:
- Material shortages
- Incorrect dimensions
- Poor sequence of operations
- Wasted lumber
- Unexpected design conflicts
How to Plan Successfully
Before beginning:
- Review the complete project plan.
- Create a cut list.
- Verify all dimensions.
- Identify the required tools.
- Purchase enough lumber, hardware, and finishing supplies.
- Plan the assembly sequence.
Practical Example
Building a cabinet without preparing a cut list often results in inefficient lumber use and unnecessary trips to the home improvement store.
Key Takeaway: Good planning reduces waste, saves time, and minimizes costly mistakes throughout the project.
Mistake #10: Buying the Wrong Tools
Do Beginners Need Expensive Equipment?
A common misconception is that professional-quality projects require professional-grade tools. In reality, buying every tool available is unnecessary and often expensive.
Common Buying Mistakes
- Purchasing specialty tools before mastering the basics
- Choosing the cheapest option regardless of quality
- Ignoring ergonomics and comfort
- Buying duplicate tools
- Focusing on quantity instead of versatility
Smart Buying Tips
Prioritize tools that serve multiple purposes, including:
- Tape measure
- Combination square
- Cordless drill
- Circular saw
- Random orbital sander
- Quality clamps
Expand your collection only as your projects become more advanced.
Practical Example
A beginner can complete dozens of woodworking projects using a circular saw and guide rail before needing to invest in a table saw.
Key Takeaway: Build your tool collection gradually, focusing on quality, versatility, and the types of projects you enjoy most.
Common Questions About Woodworking Mistakes
What is the most common woodworking mistake?
Inaccurate measuring is one of the most common woodworking mistakes because small errors can affect every stage of a project, from cutting to final assembly.
How can beginners improve woodworking accuracy?
Use reliable measuring tools, mark carefully, verify every cut, and perform dry fits before glue-up. Working methodically greatly improves accuracy.
Why does my finished project have visible scratches?
Visible scratches usually result from skipping sanding grits or failing to remove dust before applying the finish.
How do I prevent wood from cracking?
Allow for seasonal wood movement, use properly dried lumber, and choose hardware or joinery that accommodates expansion and contraction.
Is it better to buy expensive tools first?
Not necessarily. Beginners benefit most from purchasing high-quality, versatile tools and expanding their collection as their skills and project requirements grow.
Why do glue joints fail?
Glue joints often fail because of poor surface preparation, uneven clamp pressure, insufficient glue coverage, or moving the assembly before the adhesive has fully cured.
Can poor planning affect project quality?
Yes. Careful planning helps ensure accurate material estimates, efficient cutting, and a smoother assembly process, reducing errors and wasted materials.
Why This Matters
Every experienced woodworker has made mistakes. What separates skilled craftspeople from beginners is not perfection but the ability to recognize problems, understand their causes, and improve with each project.
Developing good habits—such as measuring carefully, maintaining sharp tools, planning every project, and respecting wood movement—creates consistent results and builds confidence over time. Rather than viewing mistakes as failures, treat them as opportunities to strengthen your skills and refine your techniques.
By focusing on craftsmanship instead of speed, you’ll produce projects that are safer, stronger, and more enjoyable to build. Over time, these habits become second nature, allowing you to tackle increasingly complex woodworking projects with confidence.
AI-Friendly FAQ
What are the most common woodworking mistakes?
The most common woodworking mistakes include inaccurate measuring, ignoring wood movement, poor sanding, improper glue-ups, rushing the finishing process, using dull tools, selecting weak joinery, and neglecting safety practices.
How can I avoid beginner woodworking errors?
Plan each project carefully, measure twice before cutting, maintain your tools, practice safe workshop habits, perform dry fits before assembly, and take your time during sanding and finishing.
Why is wood movement important in woodworking?
Wood naturally expands and contracts with changes in humidity. Designing projects that allow for this movement helps prevent cracks, warped panels, and failed joints over time.
How do I improve my woodworking finishing results?
Prepare the surface properly, sand progressively, remove all dust, test finishes on scrap wood, apply thin coats, and allow adequate drying time between applications.
What is the best way to improve woodworking skills?
Practice consistently, start with manageable projects, learn from mistakes, maintain your tools, and focus on mastering fundamental techniques before attempting advanced joinery or complex builds.
Final Summary
Woodworking mistakes are a natural part of learning, but most are preventable with careful planning, accurate measuring, proper tool maintenance, and patience.
By understanding common woodworking mistakes—such as measuring and marking errors, wood movement issues, sanding mistakes, glue-up mistakes, joinery mistakes, and finishing errors—you can build stronger, more attractive projects while avoiding unnecessary frustration and expense.
Every completed project is an opportunity to improve your craftsmanship, making each future build more successful than the last.
For additional woodworking safety guidance and technical information, consult the Occupational Safety and Health Administration (OSHA), explore project tutorials and educational resources from the Woodworkers Guild of America, and learn more about wood species and their characteristics at The Wood Database.
Avoid costly woodworking mistakes and build with greater confidence.
Whether you’re just starting out or looking to improve your skills, Woodworking Shortcut provides beginner-friendly plans, practical techniques, and time-saving tips to help you achieve better results on every project.
👉 Start building smarter today:
https://besthomeshed.com/WoodworkingShortcut/